Intravue Appliance / Plug Update procedure
10/30/2020
To perform an upgrade of an Appliance unit:
- Download and unzip the contents of one of the following files to a suitable directory.
Version 3.2.0 (724 MB) (for Appliance only)
Version 3.2.0 tools only (37 MB)
Note that version 2.4.1b3 is currently the most recent one supported on the DreamPlug hardware
- Double-click the file 'AgentConfig.exe' which will launch the Plug Discovery tool
If the file launches and all the options are grayed out, open the file using DOS and type "java -jar agentconfig_all.jar"
DO NOT USE PREVIOUS VERSIONS OF agentconfig_all.jar or the equivilent discoverytool.jar.

- Confirm the Plug or Appliance is operational from the display which will show the IP address
(You can distinguish Plug from Appliance units by the MAC address. Plug units start 'f0:ad:4e' and Appliance units start '00:30:18')
- It is strongly recommended that before updating a Plug or Appliance you first take a 'System Archive'
(It is strongly recommended that the Appliance IP Address be static and not DHCP as the process goes through several reboots.)
To do that:
- log in as Administrator to the Intravue
- select 'Generate Support Archive'
- select 'Download Archive to User's Computer'
- select 'Confirm Download' and choose a suitable directory to store the *.zzz file
-
If you are updating an appliance with version 3.1.0 or later, you must allow root login of the appliance.
Root login has been disabled as part of security hardening implemented at version 3.1.0.
To get information on allowing root login you must make a request to techsupport@panduit.com
as publishing this info would defeat the security hardening.
-
Double-click the file 'ApplianceUploader.exe' which will launch the update utility
If the file launches and all the options are grayed out, open the file using DOS and type "java -jar plugupd_all.jar"
The utility allows appliances to be updated in 2 ways:
- Using a 'tgz' archive file. This is most suitable for customer loads and disconnected networks.
- Using 'rsync' from a server accessible on the Internet or Intranet. This is a faster process in most cases,
but may not be available in many customer situations. Contact Technical Support for assistance and instructions.
You can choose to preserve existing user data, or to restore the unit to factory state
(removing any Intravue database etc).
Usually in a customer situation you will want to preserve user data
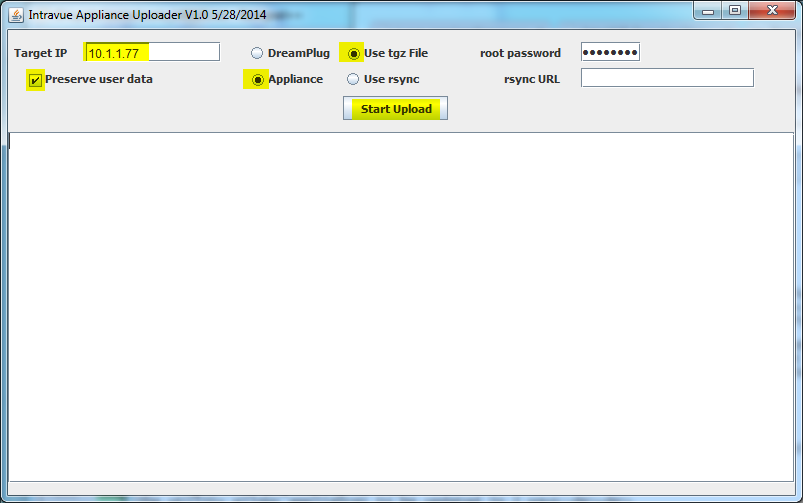
- Set the IP address of the plug or appliance as 'Target IP'
- Select Appliance or Dreamplug
- Select 'Preserve user data' (or not)
- Click 'Start Upload'
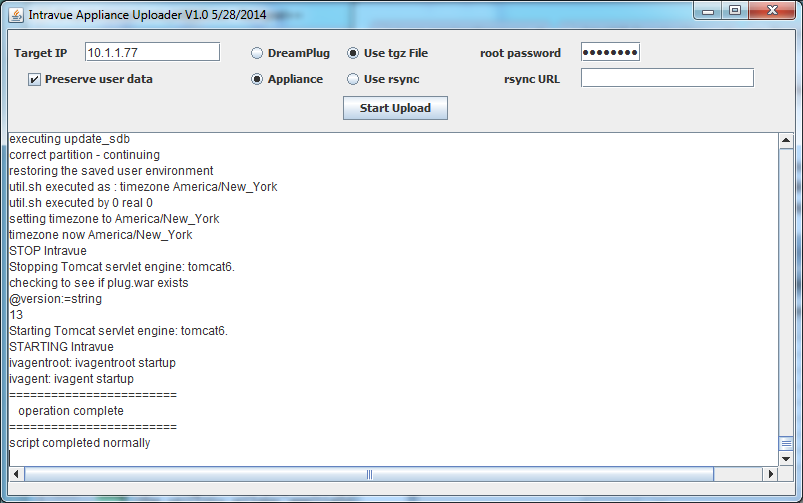
The upload will now start. It will take a few minutes, during which time the screen will show a series of messages indicating progress
There will be 2 pauses of up to 2 minutes each when the program requests that the appliance reboot, and the display will show (repeatedly)
attempting to connect...
attempting to connect...
Finally you should see the display as follows
If you elected to preserve the user data, in most cases the system will start running normally.
However, if it is necessary to reload the previously saved system archive, simply do the following
- log in as Administrator to the Intravue
- select 'Generate Support Archive'
- select 'Upload Previously Downloaded Support Archive'
- click 'Choose File' and select the correct *.zzz file
- select 'Upload Support Archive'
This will have uploaded but not loaded the database.
To perform the final step:
- select 'System Configuration...'
- select the Database tab
- click 'Restore Database from File' (and accept the warning)
- select the database backup file
- click 'OK'